Local file sharing with Samba and VirtualBox guests
VirtualBox is an excellent tool to run one or many virtual Windows machines on a Linux host. Its shared folders offer convenient access to the host file system from the virtual machines. However, shared folders may not be suitable for specialized tasks such as storing .NET application-level Office addins. In this article I describe an alternative way to share folders between the host and guest operating systems using the Samba file server.
VirtualBox shared folders
To make use of the shared folders feature that is built into VirtualBox you need to install the VirtualBox guest additions in the guest operating system. Then you can easily choose the folders to share using the VirtualBox GUI as described in the user manual. You do not need to set up a network for the virtual guest to be able to use shared folders.
The drawback: Windows security zones
VirtualBox’ shared folders work fine unless you want to access program files that are saved in those shared folders. In my particular case, I experimented with a .NET version of the XL Toolbox. Regardless how much I relaxed the security settings both in the guest Windows’ internet settings and in the Office Security Center, the .NET addin for Excel would not load. This caused me to look for alternatives to share files between my Linux host and the Windows guests.
Sharing folders using Samba
Samba is a free implementation of a Windows file server. It is easily installed in Ubuntu Linux by issuing this command:
sudo apt-get install sambaSamba setup
Since I only want to allow file sharing on my own laptop between the host
system and the virtual guest systems, I told Samba to only bind to the
local loopback network interface and a virtual local network that we are
going to set up in a minute. The configuration is done in the file
/etc/samba/smb.conf:
[global]
# We will use the workgroup XLTOOLBOX for our virtual guests as well.
workgroup = XLTOOLBOX
wins support = yes
dns proxy = no
interfaces = 127.0.0.0/8 192.168.200.0/24
bind interfaces only = yes
When set up in this way, Samba will only respond to requests from the
local network. Please note that the network 192.168.200.0/24 was chosen
arbitrarily by me; it is different from the LAN that my FRITZ!Box
wifi router creates (which is 192.168.178.0/24). Any requests that the
router might let slip through to us should not be responded to by the
Samba server, since the Server does not listen to the router network.
It is necessary to create a Samba password:
smbpasswd
Sharing a folder
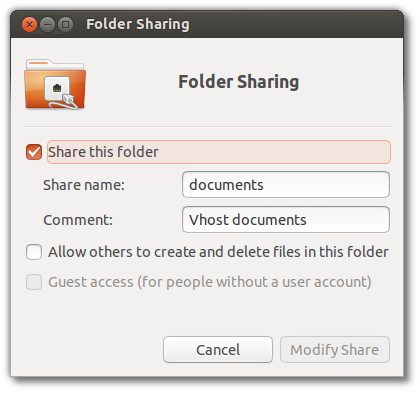
Sharing a folder in Ubuntu is as simple as right-clicking on the folder in the Files window, and choose “Sharing Options”:

Make sure to not allow others to create and delete files in this folder.
Alternatively, if you like to use the terminal, issue something like this:
net usershare add documents /home/daniel/Documents "Vhost documents" daniel:fOf course, you need to adjust the paths and user name to your own.
The net usershare command also provides options to list and remove
shares; the options are displayed when the command is issued as-is.
Setting up a virtual network on the host
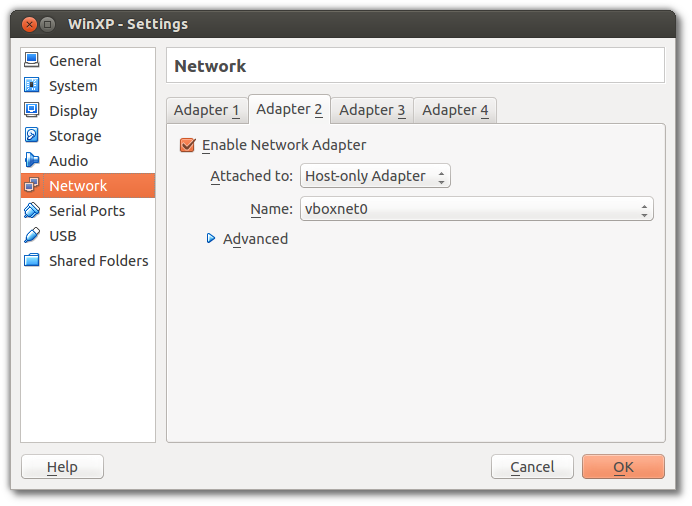
VirtualBox offers host-only networks to make sure a guest operating system communicates only with the host, but not with the internet outside of the host.
To enable this feature, choose the corresponding setting in the box’ properties:

The name of the network (vboxnet0) is chosen automatically by
VirtualBox.
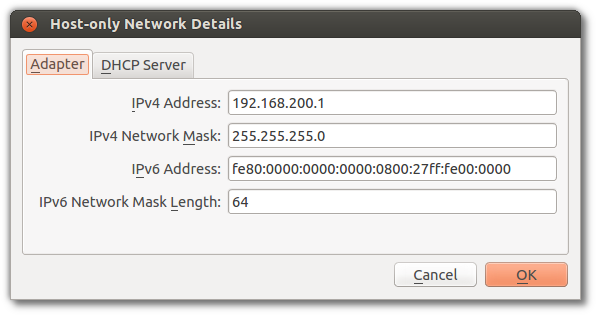
Make sure that the network address matches the one that was put in the
Samba configuration, e.g. 192.168.200.0/255.255.255.0. To accomplish
this, summon the VirtualBox main window, then click on the File menu and
choose Preferences. Locate the network tab in the Preferences window,
switch to “host-only networks”, and click the little screwdriver icon to
edit the network details:

Starting the virtual network during system boot
Note: On Ubuntu 15.10 (and maybe 15.04), the procedure described below is no longer necessary.
When set up this way, the Samba server will fail to serve the shared folders to the virtual guests. It took me a while to find out the reason for this. The problem is that Samba is started when the system is booted. Since at this time VirtualBox has not created its virtual network yet, Samba cannot bind to the interface. As soon as a virtual guest is running, the host-only network is created, but Samba won’t automatically bind to its interface.
The solution to this problem is to create an Upstart job so that VirtualBox creates its network during system startup.
Create the following file using sudo vim, sudo nano or something
similar:
# /etc/init/vboxnet.conf
description "Start host-only VirtualBox network."
start on stopped rc RUNLEVEL=[2345]
stop on stopped rc RUNLEVEL=[!2345]
task
exec vboxmanage hostonlyif ipconfig vboxnet0 --ip 192.168.200.1
Note the usage of start on stopped rc RUNLEVEL=[2345]. Many Upstart jobs
use the stanza start on runlevel [2345]. The VirtualBox kernel
module is loaded by an “old-fashioned” System V job. System V jobs are
executed when runlevel 2 is reached. We must delay execution of our custom
Upstart job until the System V jobs have been executed. This is why it
says start on stopped rc RUNLEVEL=[2345]. With start on runlevel, our
vboxnet job and the System V init jobs would start to execute
simultaneously.
To make the Samba server wait until the VirtualBox network is up and
running, change the following line in /etc/init/smbd.conf:
start on (local-filesystems and net-device-up)
to
start on (local-filesystems and net-device-up and stopped vboxnet)
When you restart the system now, the host-only network will be set up and the Samba server will correctly bind to the network interface:
ifconfig
[...]
vboxnet0  Link encap:Ethernet  HWaddr 0a:00:27:00:00:00
          inet addr:192.168.200.1  Bcast:192.168.200.255  Mask:255.255.255.0
          inet6 addr: fe80::800:27ff:fe00:0/64 Scope:Link
          UP BROADCAST RUNNING MULTICAST  MTU:1500  Metric:1
          RX packets:0 errors:0 dropped:0 overruns:0 frame:0
          TX packets:794 errors:0 dropped:0 overruns:0 carrier:0
          collisions:0 txqueuelen:1000
          RX bytes:0 (0.0 B)  TX bytes:115199 (115.1 KB)
[...]
Mapping a drive letter to a shared folder in Windows
To map the shared folder to a drive letter in the Windows guest, make sure
to enter the username with the appropriate domain, e.g.
xltoolbox\daniel. The password is the one that you entered using
smbpasswd above. If you do not include the domain name in the login,
you will be prompted to enter you credentials every time you log into the
Windows guest system.
That’s it. Don’t forget to relax your security settings to make the virtual network trusted. This will enable you to run .NET Office addins from a network share.
Post date
Tue 26 Nov 2013Tags
Share
Recent posts
Exit ThinkPad T430s, enter ThinkPad T480s
Linux and VirtualBox on a T480s with high-resolution display
What I like and dislike about Ubuntu 18.04